
Once you’ve selected your contouring colors
as appropriate for your skin tone, it’s time to discuss the possible
ways contouring can help you enhance your look, and then we’ll look
at some specific application techniques that you can put to good use.
Contouring serves a number of purposes in make-up application, and in
fact, some of the cosmetics you already use serve similar purposes.
Eye shadow and blusher are primarily used to mimic the subtle arousal responses of a youthful body – the pinking of the cheeks and the darkening of the soft tissue around the eyes – but they also serve to give definition to the eyes and add shape to the cheeks by drawing the focus in those areas. Adding in the specific application of cosmetics that will serve the purpose of helping to enhance and adjust the shape of the face and features only serves to make the other cosmetics work even better.
What Contouring Can Do & How To
 Contouring as a general term for the cosmetic application to
refine and enhance the features covers three basic jobs: accentuating,
minimizing and contouring. These jobs are
achieved by the same basic application techniques, but the results are
important enough to have their own distinction.
Contouring as a general term for the cosmetic application to
refine and enhance the features covers three basic jobs: accentuating,
minimizing and contouring. These jobs are
achieved by the same basic application techniques, but the results are
important enough to have their own distinction.
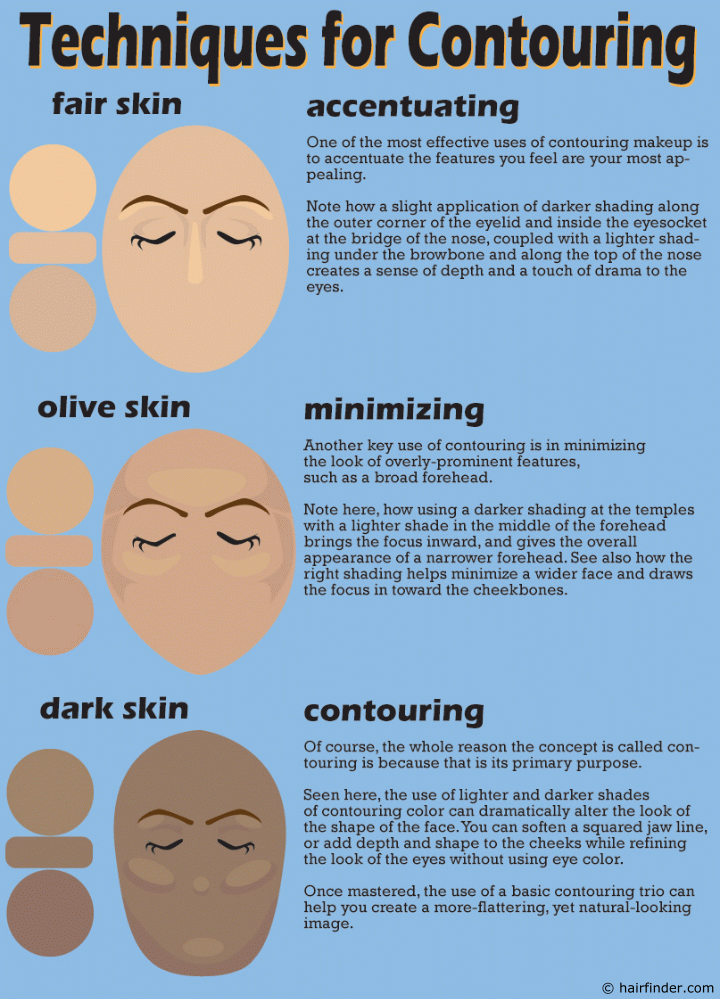
Accentuating
Accentuating your best features is probably the favorite use of contouring for most women. Making the eyes deep and sexy, making the cheekbones stand out and appear dramatic are two of the ways you can accentuate your best features with contouring. With the right combination of shading and highlighting you can create a dramatic visage and make your best features truly the stars of your face.
Minimizing
Sometimes we have features that we don’t want to appear so prominent. Perhaps our face is wide and seems flat or our forehead is too broad, and instead of enhancing these features we want to make them less prominent. Contouring make-up works for this in that you can take the shading and highlighting techniques and refine the shape of the broad features, making them appear smaller.
Contouring
Of course being called contouring make-up it is obvious that contouring would be a legitimate function of the technique. Once you master the techniques of shading and highlighting, you can subtly reshape the face and seemingly sculpt the face into the more pleasing esthetic you envision. Whether it’s a flat cheek, or a jaw that’s too square or too round, or just too much, you can alter the look of the shape and create the look that you want.
Specific Tips and Tricks
For a Flat Nose:
Use a circle of lighter color on the tip of the nose, paired with a slight shading on the underside in order to give a sense of depth and make the nose seem to extend more. Gently blend the lighter color vertically along the nose, but only to soften. Don’t spoil the effect of the lightening of the color on the tip. Blend the shading on the underside of the nose in a horizontal motion.
For Flat Cheeks:
Apply your lighter color in an elongated oval in an angle across the top of the cheekbones and pair it with a slim stripe of shading along the bottom edge of the cheekbone. This makes the cheeks appear prominent and gives depth to the face. Blend the colors by gently brushing the shading in a downward motion over the cheeks to diffuse the lower edge, and just burnish the ovals of lighter color to soften the edges.
To Reshape the Jaw Line:
Whether your problem is that your jaw is too square, too round, or you have a wattle or double chin, you can create the shape you desire by applying your shading color first along the underside of the jaw line and carefully add more shading to make the shape into which you want to transform your jaw. After placing the darker color as desired, apply an oval of lighter color on the chin.
Blend the underside of the jaw downward on the neck to fade the color and blend it into the neck, and use brushstrokes in the same direction as the curve you created at the jaw line in order to soften and blend the shading in that area. For the lighter color you applied on the cheek, use your brush and gently blend outward from the chin to reinforce the line of the jaw as you created it, and to make the new jaw line appear to come forward.
For a Wide Forehead:
Apply your lighter color in a rounded triangle shape in the center of the forehead, and use your shading color at the temples and upward toward the hairline on each side of the brows. Gently blend the shading upward and toward the center of the forehead, while lightly brushing the center lighter color to soften its edges. This will make the forehead appear to become narrower and extend slightly forward.
For a Wide Face:
Many women have a wide face at or near the eye region and upper cheeks. By applying the shading color you’ve chosen at the sides of the face from just below the brow to the cheeks and blending it in a softly curved line, and pairing it with the lighter color applied in sweeps just along the tops of the cheeks and blended to soften them, you can bring in the width of the face and bring forward the cheeks, giving depth to the eyes in the process.
Shaping and Defining the Eye Area:
Due to ethnic and other genetic factors, some women have shallower natural contours around their eyes. In some cases, this can be significant enough to make the face appear flat. To enhance eyes that are insufficiently contoured (or to enhance the contours already present) use your shading color and start at the outer corner of the eyes and create a curved shadow from the outside of the upper lid and following it along the crease of the eyelid. (In some cases of shallow eye sockets you may have to actually create the shape of the lid). Add additional vertical lines of shading along either side of the nose from the inner ends of the brows and extending downward to just past the eyes.
Pair these applications with lighter color along the underside of the brows, vertically along the bridge of the nose and in dots on the center of the eyelids. Use your blending brush gently to just remove any clear edges to the contouring make-up. This should give your eyes a depth and drama that you were otherwise lacking.
So, as you can see, contouring is a simple concept to learn that can take some effort and practice to master. However, the results of getting these techniques down are clear, and will allow you to create more dramatic and pleasing make-up looks for yourself and your friends with special needs.
Eye shadow and blusher are primarily used to mimic the subtle arousal responses of a youthful body – the pinking of the cheeks and the darkening of the soft tissue around the eyes – but they also serve to give definition to the eyes and add shape to the cheeks by drawing the focus in those areas. Adding in the specific application of cosmetics that will serve the purpose of helping to enhance and adjust the shape of the face and features only serves to make the other cosmetics work even better.
What Contouring Can Do & How To
 Contouring as a general term for the cosmetic application to
refine and enhance the features covers three basic jobs: accentuating,
minimizing and contouring. These jobs are
achieved by the same basic application techniques, but the results are
important enough to have their own distinction.
Contouring as a general term for the cosmetic application to
refine and enhance the features covers three basic jobs: accentuating,
minimizing and contouring. These jobs are
achieved by the same basic application techniques, but the results are
important enough to have their own distinction.Accentuating
Accentuating your best features is probably the favorite use of contouring for most women. Making the eyes deep and sexy, making the cheekbones stand out and appear dramatic are two of the ways you can accentuate your best features with contouring. With the right combination of shading and highlighting you can create a dramatic visage and make your best features truly the stars of your face.
Minimizing
Sometimes we have features that we don’t want to appear so prominent. Perhaps our face is wide and seems flat or our forehead is too broad, and instead of enhancing these features we want to make them less prominent. Contouring make-up works for this in that you can take the shading and highlighting techniques and refine the shape of the broad features, making them appear smaller.
Contouring
Of course being called contouring make-up it is obvious that contouring would be a legitimate function of the technique. Once you master the techniques of shading and highlighting, you can subtly reshape the face and seemingly sculpt the face into the more pleasing esthetic you envision. Whether it’s a flat cheek, or a jaw that’s too square or too round, or just too much, you can alter the look of the shape and create the look that you want.
Specific Tips and Tricks
For a Flat Nose:
Use a circle of lighter color on the tip of the nose, paired with a slight shading on the underside in order to give a sense of depth and make the nose seem to extend more. Gently blend the lighter color vertically along the nose, but only to soften. Don’t spoil the effect of the lightening of the color on the tip. Blend the shading on the underside of the nose in a horizontal motion.
For Flat Cheeks:
Apply your lighter color in an elongated oval in an angle across the top of the cheekbones and pair it with a slim stripe of shading along the bottom edge of the cheekbone. This makes the cheeks appear prominent and gives depth to the face. Blend the colors by gently brushing the shading in a downward motion over the cheeks to diffuse the lower edge, and just burnish the ovals of lighter color to soften the edges.
To Reshape the Jaw Line:
Whether your problem is that your jaw is too square, too round, or you have a wattle or double chin, you can create the shape you desire by applying your shading color first along the underside of the jaw line and carefully add more shading to make the shape into which you want to transform your jaw. After placing the darker color as desired, apply an oval of lighter color on the chin.
Blend the underside of the jaw downward on the neck to fade the color and blend it into the neck, and use brushstrokes in the same direction as the curve you created at the jaw line in order to soften and blend the shading in that area. For the lighter color you applied on the cheek, use your brush and gently blend outward from the chin to reinforce the line of the jaw as you created it, and to make the new jaw line appear to come forward.
For a Wide Forehead:
Apply your lighter color in a rounded triangle shape in the center of the forehead, and use your shading color at the temples and upward toward the hairline on each side of the brows. Gently blend the shading upward and toward the center of the forehead, while lightly brushing the center lighter color to soften its edges. This will make the forehead appear to become narrower and extend slightly forward.
For a Wide Face:
Many women have a wide face at or near the eye region and upper cheeks. By applying the shading color you’ve chosen at the sides of the face from just below the brow to the cheeks and blending it in a softly curved line, and pairing it with the lighter color applied in sweeps just along the tops of the cheeks and blended to soften them, you can bring in the width of the face and bring forward the cheeks, giving depth to the eyes in the process.
Shaping and Defining the Eye Area:
Due to ethnic and other genetic factors, some women have shallower natural contours around their eyes. In some cases, this can be significant enough to make the face appear flat. To enhance eyes that are insufficiently contoured (or to enhance the contours already present) use your shading color and start at the outer corner of the eyes and create a curved shadow from the outside of the upper lid and following it along the crease of the eyelid. (In some cases of shallow eye sockets you may have to actually create the shape of the lid). Add additional vertical lines of shading along either side of the nose from the inner ends of the brows and extending downward to just past the eyes.
Pair these applications with lighter color along the underside of the brows, vertically along the bridge of the nose and in dots on the center of the eyelids. Use your blending brush gently to just remove any clear edges to the contouring make-up. This should give your eyes a depth and drama that you were otherwise lacking.
So, as you can see, contouring is a simple concept to learn that can take some effort and practice to master. However, the results of getting these techniques down are clear, and will allow you to create more dramatic and pleasing make-up looks for yourself and your friends with special needs.

No comments:
Post a Comment